Timeline
The Timeline plugin allows you to display items on a timeline in your Omeka Classic site.
Timeline adds a public page to your navigation, with a textual list of all the timelines created on your site. Each individual timeline also gets a URL that can be added to your navigation manually. Timelines can be displayed in pages using shortcodes, or as part of exhibits.
Timeline dates and intervals must be in ISO 8601 format (YYYY-MM-DDThh:mm:ss). This includes "1901", "1901-05", and "1901-05-31" formats. See the section below for precise information on accepted formats.
You can supply a period of time with a / separator between the interval beginning and end. If date/interval values are not formatted correctly, the item will be left out of the timeline.
If an item has multiple date values or interval values, the Timeline plugin will accept the first properly formatted value: so, if you have textual dates such as "circa 1850" or "16??" Timeline will ignore these in favor of a numerical value.
If an item has both a discrete date value and interval value in the fields mapped by timeline metadata, the interval value will take precedence over the date value. An item with an interval does not need to have a discrete date value.
Admin interface
The Timeline plugin will add a new link to the admin sidebar, "Timeline". Here you will see existing timelines and be able to rearrange them for the public display on the youromekasite.org/timeline page. This order can be reset with the "Reset Timeline order" button.
This page is added to your site navigation automatically; you can remove or temporarily disable it until you create some public timelines.
You can add a new timeline from this page, or edit existing timelines. You can also delete timelines; you will see a confirmation window.
Add a timeline
To create a timeline, click the "Add a Timeline" link on the "Timelines" page in the left-hand sidebar.
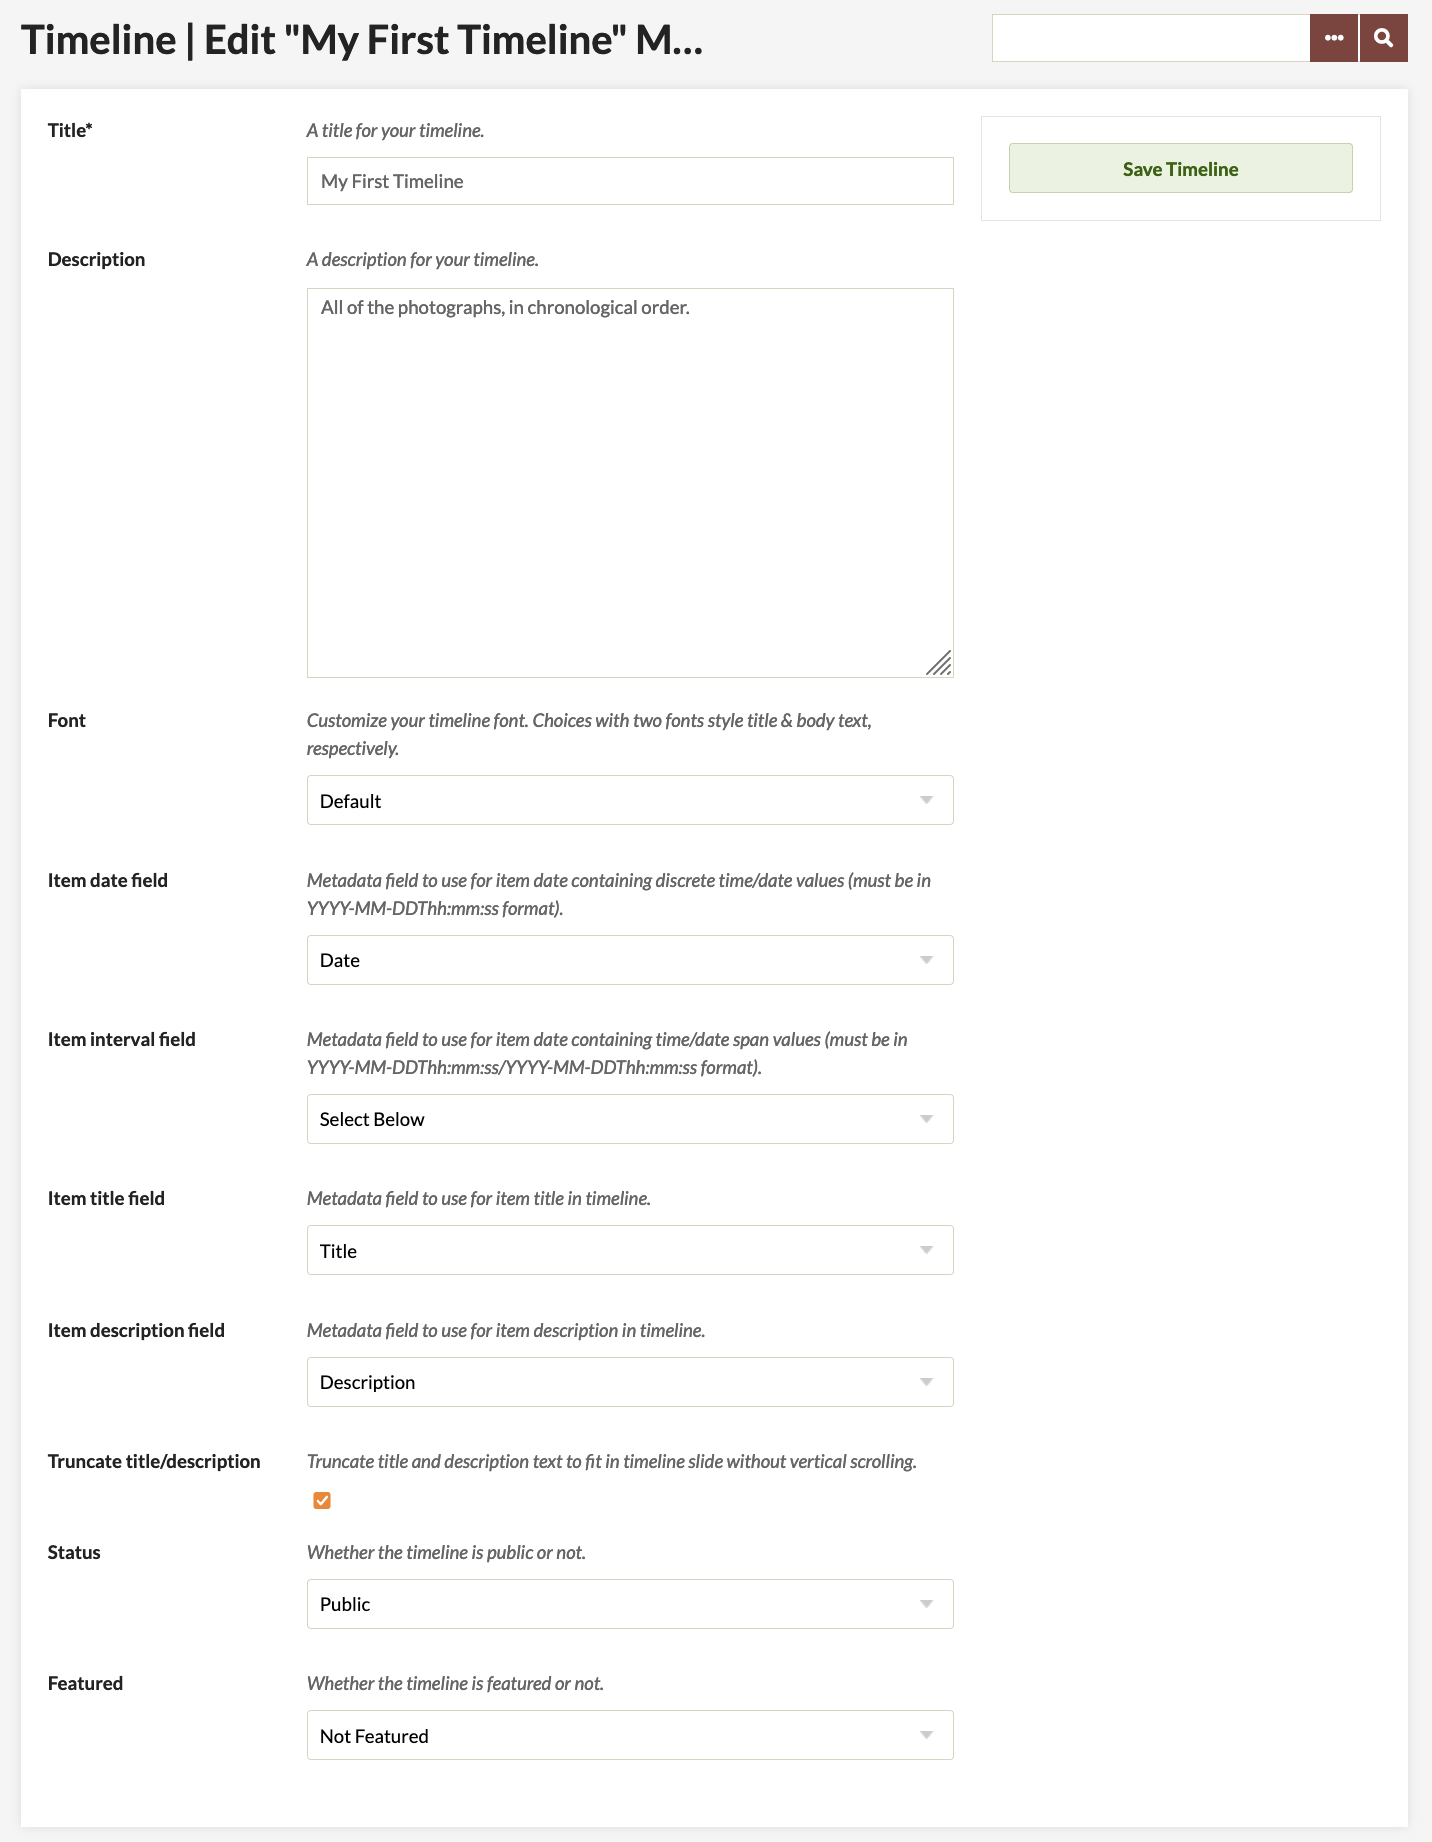
On the "Add a Timeline" page, enter the following metadata:
- Title: the name of your timeline, which will be displayed to users (required).
- Description: an introduction or overview for the timeline.
- Font: choose from several pre-set combinations of title and description fonts.
- Item date: a dropdown to select the metadata field to use for item date containing discrete time/date values.
- Item interval: a dropdown to select the metadata field to use for item date containing time/date span values (the chosen field must use a
/separator between two ISO-8601 formatted dates). - Item title: a dropdown to select the metadata field to use for item titles.
- Truncate: if checked, the textual part of each slide will not offer vertical scrolling when needed; instead, the text will fade out at the bottom of the timeline slide.
- Item description: a dropdown to select the metadata field to use for item descriptions.
- Status: a dropdown to select whether the timeline is public or not public.
- Featured: a dropdown to select whether the timeline is featured or not featured.
Once you have entered the metadata, click "Save Changes" to create your timeline. If your timeline was sucessfully saved, you will be taken to the Query page to add items to your timeline.
To edit the timeline's settings later, such as to change the font choice, go back to the "Timeline" sidebar entry and select "Edit Metadata" for the timeline in question. Or, you can click the timeline's title to go to its summary page, and click "Edit Metadata" from there.

Add items
Your timeline will appear empty until you populate it. To add items to your timeline, click "Edit Item Query" on the Timeline homepage, or from the specific timeline's summary page (found at /admin/timeline/show/1 where 1 is the ID number of the timeline).

On the edit page, you can add items via the following fields:
- Search for Keywords
- Narrow by Specific Fields
- Search by a range of ID #s
- Search by Collection
- Search by Type
- Search by User
- Search by Tags
- Public/Non-Public
- Featured/Non-Featured.
As well, plugins can add more search fields, such as:
- Geolocation search
- Search by Exhibit
- Item Relations.
You can add items using one or any combination of these fields. For instance, if you know that the majority of the content for the timeline is contained in a single exibit, you can select that exhibit in the corresponding dropdown. If you wanted to be sure you did not miss any relevant items that were not included in that exhibit, you may want to use the "Specific Fields" search to include any items mentioning the topic in their metadata that are not part of that exhibit. Or, you may want to search by a specific user if you only want to include that person's work.
Once you have filled in all the desired search fields, click "Search for items". This will add all relevant items to your timeline.
Timeline summary

Each timeline will have a summary page (found at /admin/timeline/show/1 where 1 is the ID number of the timeline). Here you can see a preview of the timeline to confirm it is loading the correct items from the query; you can also view the public page of the timeline to see the same thing with its display settings and in your theme.
You can adjust the metadata and display settings with the "Edit Metadata" button. To further add or remove items from your timeline, you can adjust your query by clicking "Edit Item Query". If you click "Delete", you will delete the entire timeline and its metadata. To see the public view of your timeline, click "View Public Page".
Date formats
You may need to manually edit some date or interval values to include items on your timeline to match ISO 8601 formats.
Use the following formats for dates, including dashes between values:
20222022-08(year and month, no date)2022-08-18.
Use the following formats to add times to your date values:
2022-08-18T17:26:49+00:00(time offset from UTC)2022-08-18T17:26:49Z(coordinated universal time).
You cannot omit the year while providing a month and/or day. You cannot supply ordinal dates (as in, 2000-175 for the 175th day of the year 2000).
Use the following formats for intervals with start and end points:
2007/20082007-03/2008-05(Will appear in the timeline as "March 2007 - May 2008")2007-03-01T13:00:00Z/2008-05-11T15:30:00Z(Will appear in the timeline as "1 March 2007 13:00:00 +00:00 — 11 May 2008 15:30:00 +00:00").
You cannot supply a duration value.
Display your timeline
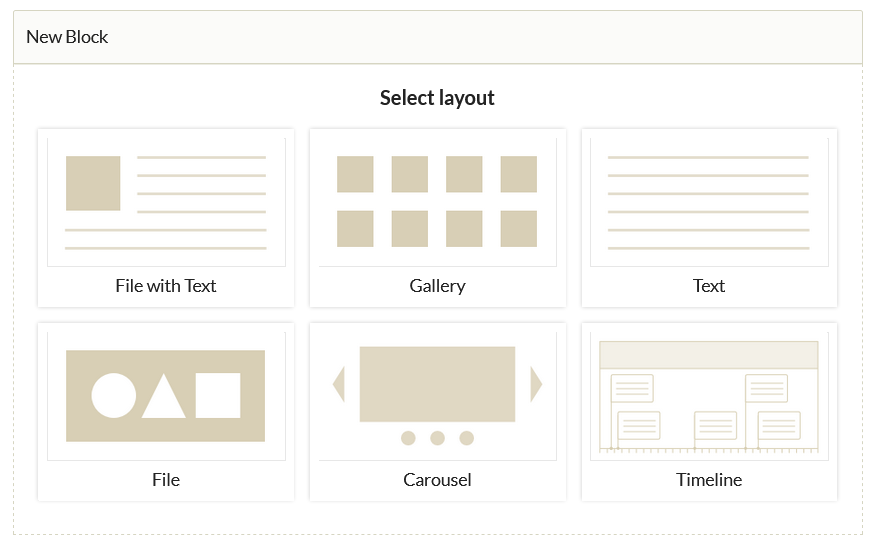
There are several different methods you can use to view and/or display your timeline. Timeline integrates with the Exhibit Builder plugin by adding a new Timeline block option to exhibit pages:
You can also add a timeline to a page using Shortcodes. The shortcode is [timeline title= '']with the timeline title value inserted. If no valid title is supplied, nothing will display.