ThreeDViewer (3D) Module for Omeka S


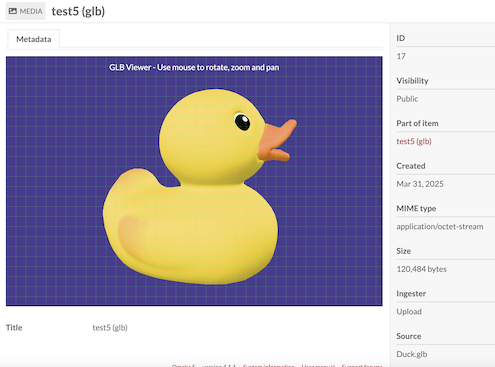
This module allows users to view and interact with 3D models (STL and GLB files) directly within Omeka S.
Features
- View 3D models (STL and GLB formats) directly in the browser
- Interactive controls for rotating, zooming, and panning 3D models
- Fullscreen and compact interaction-help controls for GLB/glTF models in the model-viewer renderer
- Customizable display options including background color
- Optional auto-rotation for better visualization
- Grid display option for better spatial reference
- Lighting fixed to the model (default) or to the viewer, so turning a model brings its shadowed side into the light
- A choice of up axis for STL files (Y or Z), so STL models show the same way up with either library
- Configurable lighting: overall brightness, and an optional light rig (an ambient light plus up to four lights, each with its own colour, strength and direction) built the same way in every viewer
- Per-site lighting: each site can override the module's lighting settings
- Optional lighting controls on every viewer, so visitors can change each light's colour, strength and direction
- Toggle between the original Three.js/model-viewer pipeline and an experimental Babylon.js renderer
- Babylon.js renderer with configurable cameras, lighting, and WebXR support
Installation
Manual Installation
- Download the latest release from the GitHub repository
- Extract the zip file to your Omeka S
modulesdirectory - Log in to the Omeka S admin panel and navigate to Modules
- Click "Install" next to Three3DViewer
Installation
See general end user documentation for Installing a module
Usage
- Upload STL or GLB files to your Omeka S items as you would any other media file
- When viewing an item with a 3D model, the model will automatically be displayed in an interactive viewer
- Use your mouse to:
- Left-click and drag to rotate the model
- Right-click and drag to pan
- Scroll to zoom in and out
- The module settings allow administrators to choose the default viewing library. Select the legacy Three.js/model-viewer stack for the original experience or opt into Babylon.js for advanced camera behaviour, lighting presets, optional environment ground/skybox, WebXR (VR/AR) support, and an inspector toolbar for fine-tuning scenes on demand.
- STL up axis: STL files don't record which way is up, and by default the two libraries assume different axes (Three.js: Y, Babylon.js: Z), so an STL model upright in one lies on its back in the other. Keep current behaviour (the default) leaves both as they are. Y up or Z up shows STL models that way up with either library; Z up is the usual convention for 3D printing and CAD. The model is turned, never mirrored. GLB and glTF files are not affected: glTF defines Y as up.
- The lighting settings, after Lighting in the module settings:
- Brightness multiplies every light (in model-viewer, it sets the exposure).
- Lights: Viewer default keeps each viewer's own lighting. Custom builds the same light rig in every viewer: an ambient light and 1–4 lights, each with a colour, a strength, a direction (degrees round the model from the viewer's side, positive to the right) and a height (degrees up from level). model-viewer has no lamps, so there the rig is painted into the environment image that lights the model.
- model-viewer environment (with Viewer default): model-viewer's own,
neutral,legacy, or an image URL; and the strength and softness of the shadow under the model. Settings that don't apply are hidden: the light rig until Lights is Custom, each light beyond Number of lights, the custom environment URL until Custom image is chosen, and the model-viewer or Babylon.js settings while the other library is selected (in a site's settings, the module's library). The settings after the general ones are grouped: Lighting for every viewer, the custom light rig (set in under Lights, one group per light), then model-viewer's and Babylon.js's own. - Show lighting controls on viewers (off by default) adds a Lighting button (a sun) to every viewer's toolbar. It opens a panel with a row for each of the scene's lights, showing its colour and strength; the row opens onto the light's direction and height, as the light allows. The panel also has Fixed to the model / Fixed to the viewer, Reset and Close; Escape or a click outside it also closes it, while dragging the model leaves it open. Directions and heights are as seen from where the camera is: fixed to the model, the lights turn with the model as you turn it, and the sliders follow them round (a height goes below 0 once you look down on a low light). Changes affect only that viewer and are never stored: reloading the page restores the configured lighting. Each site can show or hide the controls whatever the module setting. Unlike the Babylon.js toolbar, which embeds the Babylon.js Inspector (a developer tool, for that viewer only), the panel shows only the lights, the same way in all three viewers.
- Each site can override the lighting settings in its own settings, under 3D viewer lighting and the groups after it. A field left as Use the module setting (or blank) keeps the module's value. The light rig is overridden whole: a site uses the module's lights, each viewer's default lights, or a complete rig of its own.
Local Development with Docker
This repository includes a Makefile and a docker-compose.yml for quick local development using erseco/alpine-omeka-s.
Quick start
make up
Then open http://localhost:8080.
Sample data import
On first boot, the container automatically installs CSVImport and, if data/sample_3d_data.csv is present, imports it so you immediately have items to test the viewer. To trigger a manual import inside the container, run:
make shell
cd /var/www/html && OMEKA_CSV_IMPORT_FILE=/data/sample_3d_data.csv php import_cli.php "$OMEKA_CSV_IMPORT_FILE"
Preconfigured users
The environment automatically creates several users with different roles:
| Role | Password | |
|---|---|---|
| admin@example.com | global_admin | password |
| editor@example.com | editor | 1234 |
The ThreeDViewer module is automatically enabled, so you can start testing right away.
Useful Make commands
make up– Start Docker containers in interactive modemake upd– Start in detached mode (background)make down– Stop and remove containersmake shell– Open a shell inside the Omeka S containermake lint– Run PHP_CodeSniffermake fix– Auto-fix coding style issuesmake package VERSION=1.2.3– Build a.ziprelease of the modulemake test– Run PHPUnit tests
Run make help for a full list.
Coverage
Run make test-coverage with PCOV or Xdebug enabled. CI measures Module.php and all PHP files in src/, requires at least 90% line coverage, and uploads the Clover report to Codecov using GitHub OIDC. Codecov requires 90% for both project and patch coverage.